Sales
- Customer Maintenance
- Overview of Customer Accounts
- Looking up/Finding a Customer
- Creating a Customer
- Credit Hold
- Tax Exemption
- Payment Terms
- Dealer Program
- Wire Transfers
- Customer Shipping Accounts
- Order Entry
- Creating Quotes
- Turn a Quote into a Sales Order
- Deleting Quotes and Sales Orders
- Creating Shipping Quotes
- Starship AdHoc Rate Quote
- Determining Lead Time
- International Orders and Customs Documents
- Amazon Orders
- Coupons
- Marketing/Internal Orders
- Product Information
- Customer Communication
- After Sales Items
- Shipment Tracking
- Expediting Customer Orders
- Returns
- Invoice History
- Damaged, Missing, and Incorrect Orders
- Custom Targets
- Website
- Sage Pricing
Customer Maintenance
Customer Maintenance is the module you will use to look up customer account, find history, invoices, open orders, quotes, and any specific notes on their account. This is also where you will set up new customer accounts. You can get to Customer Maintenance by going to Accounts Receviable then you should see Customer Maintenance.
Overview of Customer Accounts
Header

Additional


Looking up/Finding a Customer
Finding existing customer accounts is extremely important, and helps us avoid having multiple accounts for the same customer. Sage is quite picky about how you search, so searching by company/department name is often not the best way to find accounts. For example, the account for the Provo Police Department could be saved under the following names:
- Provo Police Department
- Provo PD
- Provo Police Dept
- Provo City Police Department
- City of Provo
- City of Provo Police Department
Sage's search will only search for exact terms, so if you don't know exactly what name an account is under it won't come up. Luckily, there's details that are always consistent like address, zip code, and email domain. If you can't find an account by name, try searching by billing zip code, then email domain, then street address.
## Searching by ZIP Code
To search by a customer's zip code, click on the search icon next to the Customer No. field in Customer Maintenance
On the search window that comes up, change the search field to "Zip Code" and punch in the customer's zip code. The address listed should be their billing address, so if they have a different address for shipping make sure to clarify that.
## Searching by Email Domain
If zip code doesn't work, try searching by their email domain. Change the search field to "Email Address" and change the search filter to "Ends with". Put in everything after the "@" symbol in the customer's email address, and hit Find.
# What if there are multiple accounts?
Sometimes multiple accounts will appear for the same department/company. At this point, you'll have to figure out which one to use. If any are marked with DNU, ignore those. If you scroll horizontally, you'll see some of the key details of the account. Try to find the account with the most details matching those of the customer you're talking to.
If multiple seem right, scroll all the way to the right and find the one that was used most recently. You can also check within the account to see if they've got all their details correct, or if they're set up with a tax exemption if applicable.
Creating a Customer
We're not able to create quotes or orders without an account to link them to, so it's important to set up customer accounts right.
The first step should be checking to see if an account already exists. Duplicates will make future orders significantly harder. Once you've confirmed that there's not already an account for the customer, click the button next to the search icon. This will assign an unused customer number to the account.
On the first tab, most of the information should be pretty self explanatory. If the customer has different addresses for billing and shipping, list their billing address in the address fields. The street address should always be in the first line, and the other two lines can be used for the contact or special delivery details.
If the customer has multiple email addresses, they can be separated with a semicolon.
Below those fields, you'll need to put something for the Salesperson and Tax Schedule. Salesperson should be HO (House) and Tax Schedule should always be AVATAX.
On the right side of the page, the Terms Code should automatically be set to 01 (Credit Card). Below that, list the primary contact for the account's name. That will pull up a screen where you can enter more of their details. This is helpful for reaching out to the customer in the future, so as much information as you can provide is best.
Below that, you can use the Primary Ship To box to set up multiple shipping addresses for one account. This is most useful for government or resale accounts where they may have several locations they have targets shipped to.
Once that's done, click over to the Additional Tab. Here, there's only two things we need to look at. First, if the customer is a reseller and has been approved for dealer pricing, list their Price Level in the box. Second, make sure you select the Customer Type that best suits them.
The last thing to do is set up the customer's tax exemption. For this, follow the Tax Exemptions guide.
Credit Hold
When an account is on credit hold, the customer will not have any new orders shipped to them until the unpaid balance on their account has been paid. If a customer is on credit hold, you'll see this on their account:
You can make quotes for a customer on credit hold, but when you send the quote over let them know that the order will not be shipped and send them any outstanding invoices as well. If they send a PO for the order before the hold is resolved, you can place the order and put it on hold with the reason code "CHOLD" to have the order held until the credit hold is removed.
Once their open invoices are paid, accounts receivable will remove the credit hold from their account which will automatically release all orders with the CHOLD reason. If you find an account with a credit hold that has no outstanding invoices, let accounts receivable know and they can remove the hold.
Tax Exemption
If a customer wants to be set up as tax exempt, there's a few specific steps you'll need to take to make sure they can order exempt, whether they want to do that online or with a rep.
The first step is getting a copy of their exemption certificate. They may send this when they request the exemption, or you may have to request it from them. Every department and company has one of these, and if they try to say they don't clarify that you require a document that has either their FEIN or TID number on it. You cannot exempt their account without one.
Once you've got that, find their exemption number on the document. It can take multiple forms, but the most common one is XX-XXXXXXX.
On the customer's account, open the Exemptions window. Put the customer's exemption number on the top line, then click the green check mark button to fill it in all the other lines as well.
At this point, you'll have to create the customer's account in Avalara. If you're adding an exemption to an existing account always try searching the customer's number in Avalara first to see if they've been set up in the past. If not, click "Add a customer" in the upper right corner.
On this page, fill in all the boxes that have an asterisk next to them with the details you already put into Sage. For the Taxpayer ID, you can list the exemption number. **During this step, it's very important to list the customer code correctly. The customer code is their account number in Sage with two zeros at the beginning. Without these zeros, their exemption will not sync.**
Once you've filled that in, click "Save and add certificate". This will take you to a new page where you'll list the state that the exemption is active in, the reason for the exemption, and the exemption number again.
Once this is set up, it should automatically sync with Sage. If it doesn't, you may need to wait a few minutes or double check that the details are correct in Avalara.
Payment Terms
When you make a new account, the payment terms should default to 01 (Credit Card). This means the customer is only approved to pay for orders with either a card or a check. For international customers, you can change that to 12 (Wire) so they can make wire payments instead of using a card.
Some companies prefer to be invoiced. If their account has the terms code 00 (Net 30 Days), we can accept a PO and have them invoiced. If they'd like to be invoiced but their account isn't set up with Net 30 Terms, we'll need to get them approved. For Law Enforcement/Government customers, (insert procedure here since it's possibly going to be updated). For non-government customers, you'll have to send them the Net 30 Terms application and inform them that the approval process can take up to 30 days to be completed. Once you get the application back, send it to Ireland Thomas (ithomas@actiontarget.com) and she'll get back to you once accounting has made a decision.
Dealer Program
Customers who resell our products will sometimes ask for dealer pricing. If they do, send them a copy of the dealer application document (link to the document here). Once they send it back, send it over to Josh. He'll let you know if they're approved for dealer pricing.
If the customer is approved, try Looking Up Customer Accounts to see if they've already got an account with us. If not, you'll have to create one. Once their account is set up, on page 2 on the Customer Maintenance module, you'll see a spot to put their Price Level. Put the level they were approved for in the box, and their dealer pricing will automatically apply to all their future quotes and orders.
If a customer is curious about their dealer pricing level, you can use their previous year's spend to determine what it should be. If they've met the minimum spend for a higher tier, you can simply replace the number in the box to get them better pricing.
Wire Transfers
International customers may need to pay by wire if they don't have access to a card with USD on it. If that's the case, make sure the following comments are included on their quote:
1. Paid in US Funds
2. Action Target does not pay for taxes or fees
Once the customer has approved the quote, make sure the Payment Terms is set to "Wire" and change the quote to a standard order. When you do, put the order on hold with the reason code "Wire".
Once the order is placed, let accounts receivable know to keep an eye out for the wire payment. They'll let you know when it's come in, at which point you can go back to the order and change the status from "Hold" to "Open". At this point, the order will ship when it's ready.
Customer Shipping Accounts
If a customer would like us to ship using their own shipping account, be sure to make a note in customer maintenance on tab 10, as well as setting the Ship Via to "Customer Choice".
On each order using the customer's shipping account, make a /C comment for the warehouse to ship using the customer's account and list the account number. If the account is (accounts we can use), all that's needed is the number. If the customer would like to use a different shipping company, get the weights/dims from Jennifer and send them over to the customer. The customer will have to provide shipping labels and/or the BOL for the order themselves.
Order Entry
Sales Order Entry is used to create quotes and sales orders for customers. Sales orders and quotes will be searchable inside of Sales Order Entry as long as the order or quote has not been deleted and has not been shipped. For a comprehensive view of all Sales Orders Sales Order and Quote History and Inquire should be used. For customer specific history Customer Maintenance can also be used.
This section will cover how to enter the following:
- Quote Entry
- Sales Order Entry
- Turning quotes into an order
- Deleting quotes and orders
- Etc.
Creating Quotes
Entering quotes is one of the most common tasks we do. Ensuring we accurately quote and get them to the customer as quickly as possible is critical to our business.
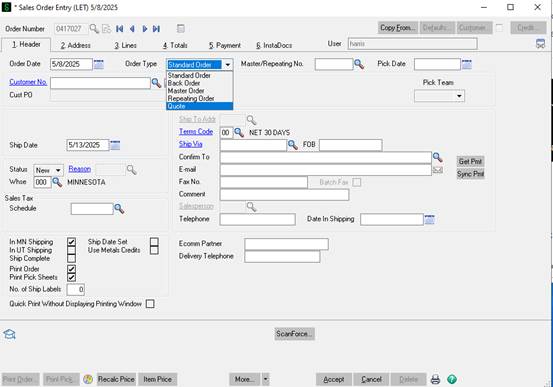
- Open Sales Order Entry
- Change the Order Type to Quote.
- Double check it is changed to quote. Failure to do so can lead to a sales order being entered, then shipped, then we will have to credit and pay for the return shipment to us. Critical this is double checked.
- The next step is to find the correct customer account. Hit the magnifying class to the right of Customer No.
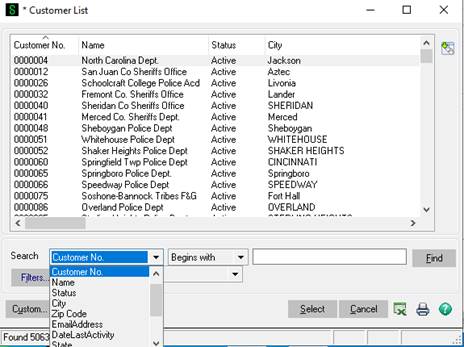
There are multiple ways to search for customers. Generally the best practice is to search by the zip code in the customers email signature then select the customer name that matches the customer name, agency, or business name. If there are multiple options look for the account with the most recent last activity date. If it's still not clear more research should be conducted. Note if a DNU is in the customer name do not use that account. If you do not have a zip code from the email then you can search by their email domain (@dpd.gov for example). If you do that make sure you change it to search by contains or ends with. If that does not work you can search by a portion of the customer's name again ensure you change from begins with to contains. For example if you are trying to find South Jordan Police department you could search contains South Jordan to find their account. The reason for this is the account name could be City of South Jordan, South Jordan PD, South Jordan, City of, etc.
-
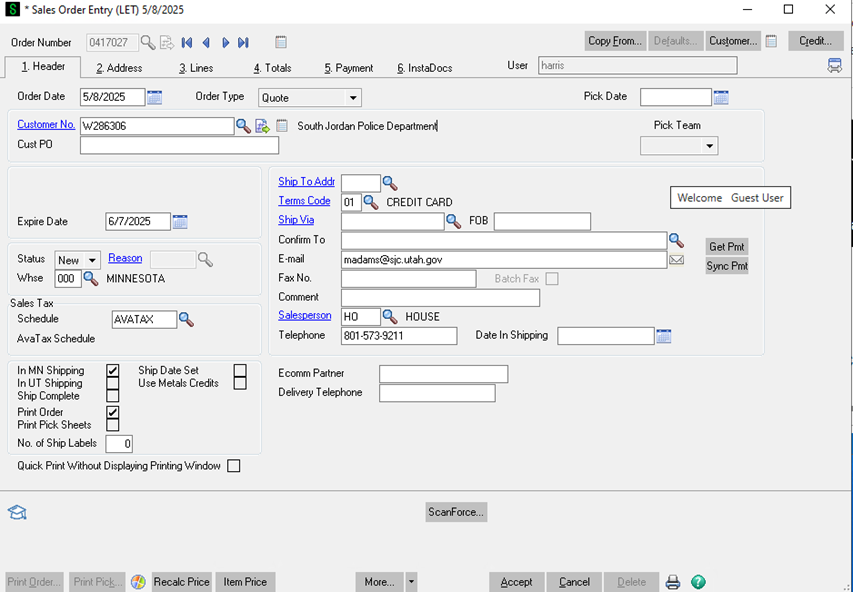
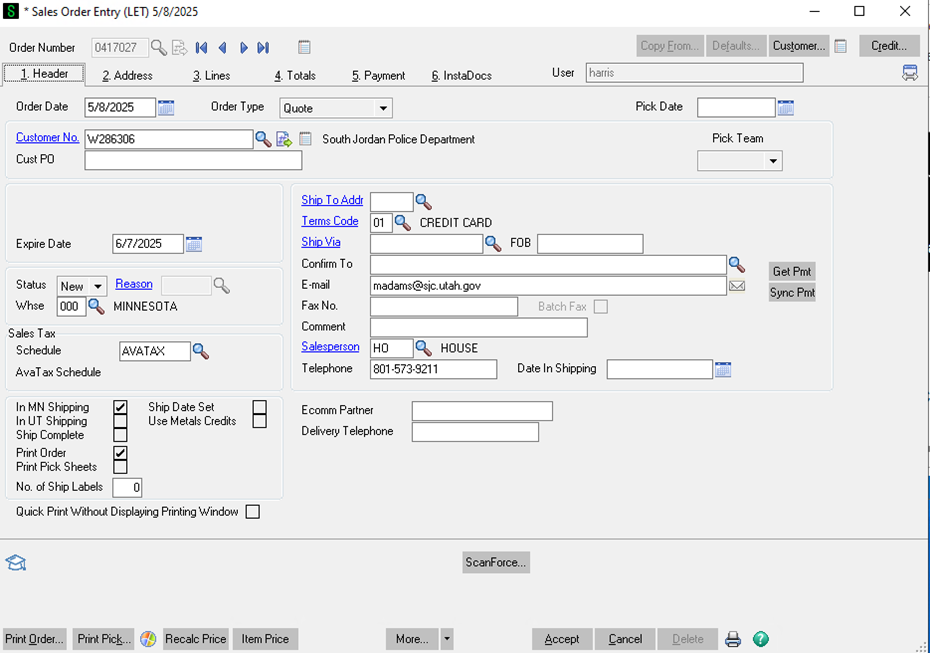
- Now that we've found and selected the customer number we can move on to entering the rest of the data on the Header Tab.
-

- The customer PO field is not required for quotes.
- In most cases it will be when entering sales orders which will be covered in another section.
- The expire date automatically goes 30 days out from when the quote is created.
- If the customer is requesting the quote should be valid for a longer period of time. Discuss with manager.
- Tax schedule should default to Avalara.
- The In MN shipping will be defaulted to checked. Once all of the items are entered on the Lines tab you will know if the order will be shipping out of MN 000, UT 001, Dropship 002 or a combination of the 3. If it's not shipping only out of MN the In UT shipping may need to be checked and the In MN shipping may need to be unchecked.
- The terms code should not be changed. If the customer has terms of credit card they can send an application for NET 30 terms but that is up to account to decide. Law enforcement agencies are the only customers we default to extending NET 30 terms to. Note that all international orders should of a terms code of wire. We will require the wire up front in full before the order is picked or shipped.
- The ship via should be FedEx Ground, USPS (ONLY IF GOING TO APO/FPO and sometimes PO boxes). FedEx overnight, FedEx 2 day, or LTL. This will be determined after we enter the lines items and determine how it will ship. So we will have to return to this main header tab.
- Ensure there is a phone number and email address.
- Next move to the Address Tab.
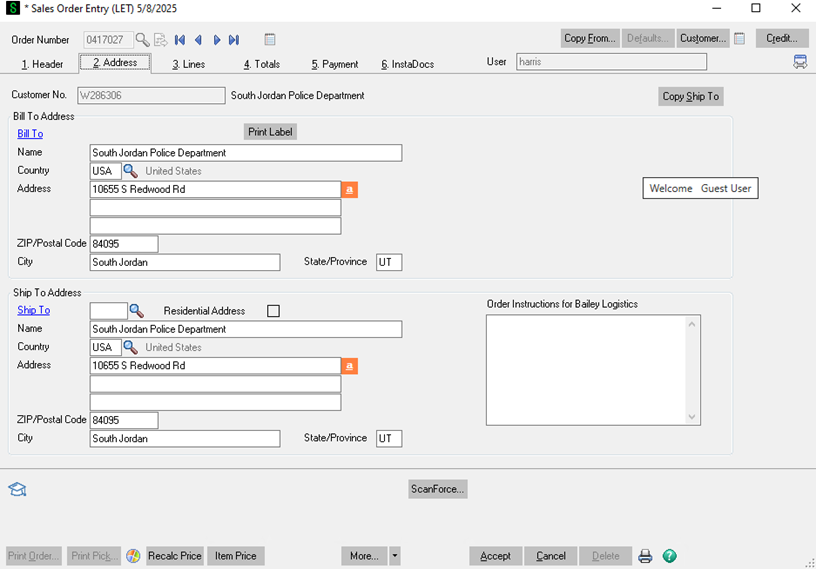
- The bill to address is pulling from the customer account. If this needs to change first ensure you have the correct customer account. If you do go to customer maintenance and change the bill to on the account. After that is compete you can change it on the quote.
- Ensure the ship to address is correct. In some cases some of our resellers will only give us a ship to zip code. That is perfectly fine at this point. When the quote changes into a sales order the Ship to address along with contact information and special instruction will need to be verified against the PO and with the customer.
- After you have the correct Ship to zip code (minimum requirement at this point) move to the Lines tab.
- On the lines tab this is where you are going to enter the products and qty the customer wants quoted.
- The section also provides some critical information you will need to be able to communicate the correct information to the customer.
- You can directly take enter the part number or search by clicking on the magnifying glass or hitting F2.
- Once the items code is entered you will need to enter the qty.
- The unit price will automatically pull up after the qty is entered.
- A few things to note.
- All of our paper targets are sold in increments of 25. So a customer could order 25, 50, 75….. 10,025 but not 2, 80, 113, etc.
- The product type will tell you if the product is aa Finished good, Discontinued, or a Kit. Finish Good and Kits are good to sell. Discontinued products require more research.
- If we have enough qty on hand we can sell that qty or less to the customer. If it's a low qty and a paper target, backer, or cardboard target contact the warehouse manager to ensure the inventory count is correct.
- Note for paper, cardboard, and or backers and it shows inventory in warehouse 003 that might as well be 0. Ignore that inventory.
- If it is discontinued with no inventory on hand but it is a paper or cardboard target we can make those to order.
- If we do that min orderable qty's will apply for paper that ranges from 2,500 to 5,000. Cardboard will always be 5,000 plus.
- Before quoting pricing to the customer 2 things need to happened.
- Let the customer know X item is discontinued but we could print it to order as long as we can hit the min or 2,500 to 5,000 (ask manager on what qty would apply to X SKU).
- If they are interested let Manager know so they can get our current cost and update the pricing before you quote the customer a price.
- Note any target that is made to order will have a 3 to 4 week lead time.
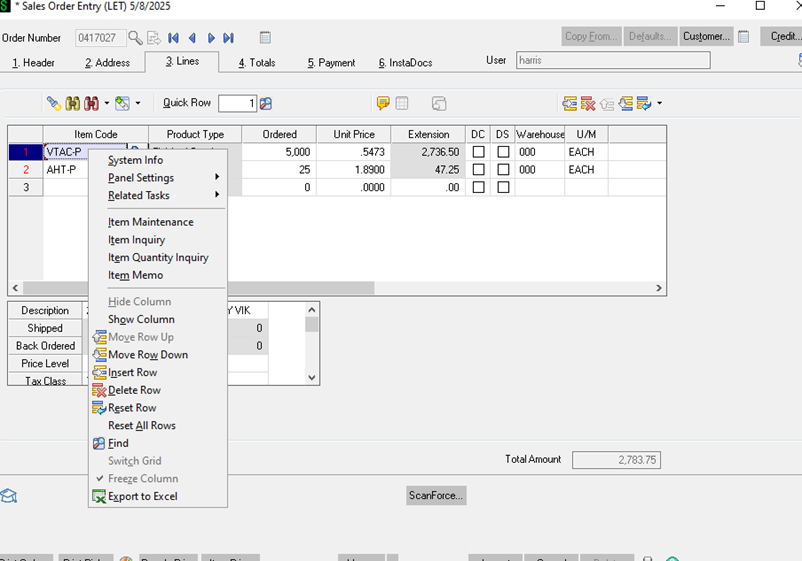
- If you right click on the Item code you can go into Item Inquiry to look at more detail.
- The DS box needs to be checked if the item is coming out of warehouse 002 (drop ship warehouse).
- The DC box is the discount box. If you run into a situation where you need to apply a X% discount this box will have to be checked for all items for the discount to calculate properly across the order.
- Next you will move on to the totals tab.
- When you do a question box will pop up asking if you want to recalculate pricing. Select No.
-

- Here you will see a few data fields.
- If you were applying a percent discount mentioned before you'd enter it in the Discount rate.
- Mainly we are looking at the weight to help determine how the order will ship.
- Shipping need to be calculated and entered in the Freight Amount box.
- Another section is dedicated on how to calculate shipping and determine the shipping method.
- The Sales Tax Amount will automatically calculate. If the customer is tax exempt and tax is showing up we will cover how to enter tax exemptions in another section.
- If everything looks good on this page we will return back to the header and enter the shipping methods (FedEx Ground, LTL, etc.) and we will check or uncheck the IN UT SHIPPING AND IN MN SHIPPING. Depending on what warehouse we are shipping out of.
- Once we have reviewed everything on the quote and we are confident everything is correct click on the Print Order button in the bottom left of the screen.
-

- It will ask if you want to save changes. Select Yes.
- To send to the customer we are going to print to a PDF.

- Save the PDF with the date and customer name (5.8SouthJordanPD for example).
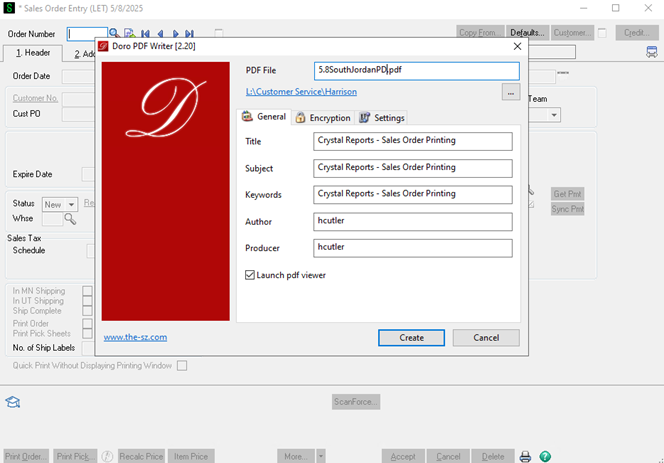
- At this point you will send the saved quote (PDF) to the customer.
- The email back to the customer should be something like: Hi Name, Attached is the quote you requested. Estimated lead time: 4 - 5 business days. Please let me know if you need anything else! Regards, Your email signature.
- We will go over how to determine the lead times of orders in another section.
- It's important you include all of the relevant information that your customer will need and address everything in their original request.
- It's always better to over communicate than under communicate.
-
- Most of our business is repeat customers so it is very important that we take care of these customers. Get them their quote as quickly as possible, ensure it is accurate, and ensure all of the information they need is included.
- Make sure we never push work onto customers that we can do for them. Ordering from us should be as frictionless as possible. For example if they don't know their account number do not push that back on them to figure out. Use whatever information you have to identify their account.
- If you run into issues ask a coworker or your manager for help.
- Pricing considerations
-
-
-
If a quote is particularly large work with manager on pricing if you think it's necessary to win the order.
-
In some cases law enforcement and military customers have budgets they need to stay under. If they do work with manager to see if we can do anything to win the order.
-
We want as many of these quotes to turn into orders as possible.
-
Paper targets have discounts biult in for all of our customers including military and law enforcement. The qty discounts are there for these customers.
-
Dealer pricing helps a lot as well.
-
-
Turn a Quote into a Sales Order
Entering Sales Orders - Turning Quotes into Sales Orders
Customers place order with us over the phone, via email, and online. Some customers use Purchase Orders (PO's), some pay by credit card, others use Metals Credit (Also referred to as brass credit), and others will have to pay with a wire before the order is placed (International orders. Sometimes they will place orders without there ever being a quote and other times they are placing an order based off a quote.
While the overall process is simple it's important to pay attention to the details. Failing to do so can cause delays in customer orders, excess shipping costs, returns, and overall a bad customer experience. The specific steps to follow are below. If a situation isn't covered here please refer to your manager.
- The customer will contact you via phone or email saying they want to place an order.
- If they are placing an order over the phone and it's not based on a quote (for example a consumer calling in) follow the quote process to create the order. Take a credit card for payment.
- Note there are additional steps the below process will cover.
- Customer sends a Purchase Order via email

- We need to verify that this order has not been placed.
- Open Sales Order and Quote History Inquiry
- Search by Customer PO
- If there's nothing there search by customer name
- If nothing pulls up you can enter the order.
- Open sales Order Entry
- If there is an existing quote like there is with this PO we will turn the quote into a sales order. If there is not that is okay we still will need to verify all of the same information. It's important to do your best to try and identify if there is an existing quote and turn it into a sales order if there is.
- On the purchase order this customer mentions the quote.

- Pull up the quote number in Sales Order Entry to pull it up.

- Change the order type to Standard Order
- Enter the PO number
- Make sure the IN MN or IN UT shipping is selected depending on the product.
- Enter the delivery phone number
-
- Then go to the address tab.
- Ensure the bill to address matches what is on the Purchase Order. If not verify you are entering this order on the correct account. If you are then it will need to be updated in customer maintenance then on the Sales order.
- Enter the ship to address exactly as it is on the Purchase order.
- There will be multiple address on PO'S. Make sure you are putting in the one that say ship to or deliver to address. If you have questions or do not know ask your manager or verify with the customer.

- On the 2nd and/or the 3rd line it's important to make sure you get a name and phone number as a point of contact for delivery. This is often not included on PO'S and you will have to ask the customer for it. At the same time make sure you ask if they need a liftgate at delivery or if they have any other specific shipping requitements. If they do those will be entered in the line items.
- The ship to address is super important. We need to get this right. If we do not it's expensive to have it picked back up and shipped to the incorrect customer. Plus it creates a bad customer experience.
- Next go to the line items tab.
- Verify the Item Code, qty, unit price, and product total match what's on the customers PO.
- Note we are doing prices at 4 decimal points. Some customers can only do 2. So it will be rounded up or down.

- If the total price of the Sales Order exceeds what's on the customers PO and the only difference is the 3rd and 4th digit make it match what's on their PO.

- Note we are doing prices at 4 decimal points. Some customers can only do 2. So it will be rounded up or down.
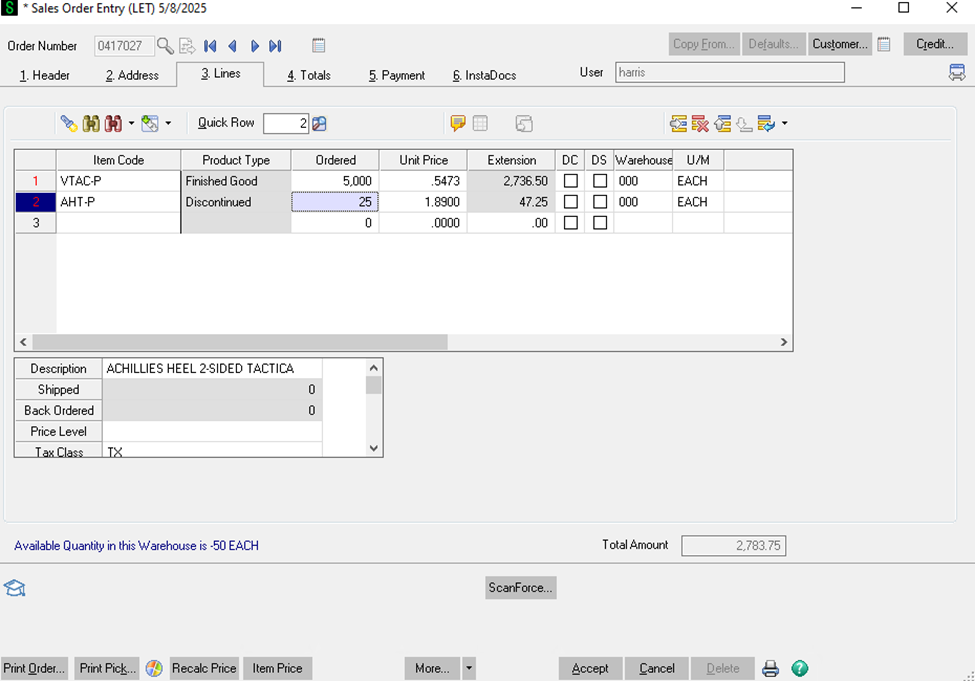
- At this point verify we have enough of all of the items in stock. You do this by clicking on the ordered cell.

- You can see in the bottom left we have over 3,000 available. So this order would be considered shippable. And the estimated lead time would be 4 - 5 business days. If there was not enough in stock right click on the item and click on item inquire.
- Doing so will take you here:
- At the bottom of this screen you can see we have 3885 on hand. That number is not what is available to ship it's what is on the shelve. If you take on hand minus On SO (SALES ORDER) that will give you the qty available we could ship on this order.
- If we do not have enough available to ship to determine the lead time go to the tab labeled as Orders (number 6)

- Here we can see all of the purchase orders we have issued for this Item code.
- The Req Date is when we expect to have more of these. If the amount on order will cover what you need for the order then add 3 - 5 business days to that day to get to the estimated ship date.
- Note this has to be done for every product on the order. Take the item with the furthest out data that is not in stock/currently fulfillable to get to the estimated ship date.
- If the order is not in stock/fulfillable go back to the Sales Order Header tab

- Change the status to hold and select the reason as insufficient qty.
- Doing this will prevent the Pick Sheet from being printed at the warehouse until there is stock.
- We do not want it to print as it will waste the warehouses teams time they could better spend on fulfilling orders or it will lead to excess shipping costs due to fulfilling a partial order, backordering, then shipping the rest of the order when it comes into stock. When we only calculated shipping as 1 shipment.
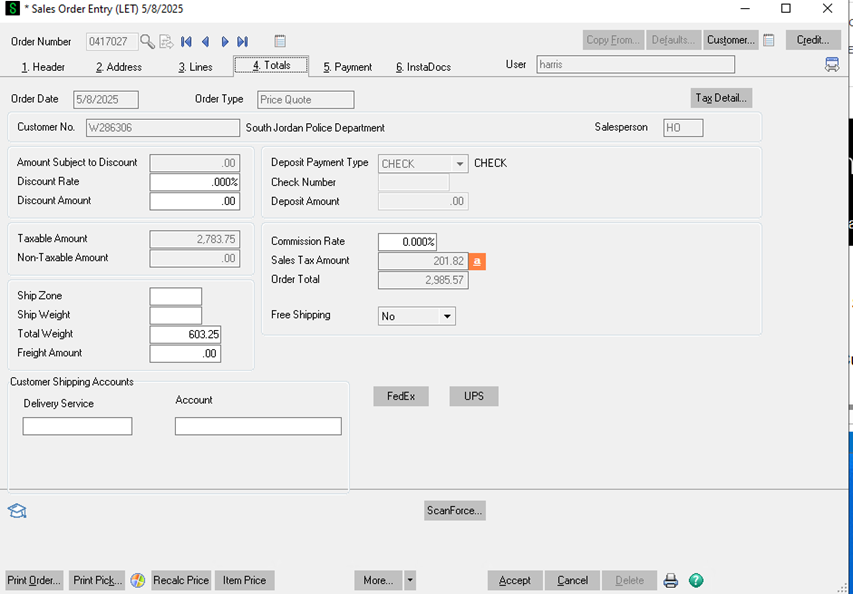
- Next go to the totals tab.
- Ensure the Order total matches the total on the PO.
- If it does not determine why. Most commonly the PO will be missing shipping or not have taxes when our quote does. If that is the case ask the customer if they can send an updated PO with shipping or ask for and apply their tax exemption before placing the order so taxes come off.

- Notice in this example the totals do not match. Their PO is for $111.00 and our total is $138.34.
- We can easily determine that is from them not having shipping.
- With this specific customer that is because we ship on their FedEx Account.
- If we are shipping on the customer's account 0 out shipping cost. Put the delivery service and account number as seen above on the totals tab. If we always ship on their account there will be a note and the same information under customer maintenance. Also ensure the ship to method is changed to customer choice on the main Header tab.

- If it does not determine why. Most commonly the PO will be missing shipping or not have taxes when our quote does. If that is the case ask the customer if they can send an updated PO with shipping or ask for and apply their tax exemption before placing the order so taxes come off.
- If the order is placed with a PO save the PURCHASE ORDER AS PO(THEIR PO NUMBER) - PO 242735A in this case.
- Drag and drop a copy of the PO into Instadocs.
- Now hit accept to place the order.
- Email the customer something like: Hi Name, Thank you for the order: Estimated ship date: 5/30/25 based on what you determined the lead time to be.


Deleting Quotes and Sales Orders
- There is a Utility in Sage to go through and delete Quotes that are expired by a certain date. Only people with Administrator role can do this. Jennifer asks Myron to do this from time to time.
- Under the Sales Order module open Sales Order Entry
- Hit tab or enter
- Click Delete in the bottom right hand corner.
- Note the cancel button is used for canceling any changes you have made in the sales order/quote. It will not delete the sales order.

- Click Yes
-
- It will ask if you want to save the deleted order in history. Select Yes.
- You will then be promoted to select a cancelation code. Select the appropriate reason and click on OK.
- The order is now deleted. Double check by searching for the order number in Sales Order Entry. It should not pull up. If you search for the order in Sales Order and Quote History Inquire you will be able to see it and that it was deleted.


Creating Shipping Quotes
How to Create a Shipping Quote – Basics
Overview summary:
This guide walks through the standard process for creating a non freight shipping quote in SAGE and StarShip. It covers how to identify item details such as size, quantity, weight, and box type, determine the correct packaging using the Shipping Document spreadsheet, and generate carrier pricing in StarShip. The document explains how to select the appropriate ground shipping option, apply the required 20 percent markup, and enter the final freight amount back into SAGE to complete the quote. This is the foundational process used for most small parcel and boxed target shipments.
How to create a shipping quote
How to Create a Shipping Quote – Freight Basics
Overview summary:
This document builds on the basic shipping process and focuses on freight shipments that require pallets and LTL carriers. It explains how to determine accurate item weight when SAGE line weights are unreliable, calculate total pallet weight including pallet allowance, and identify pallet dimensions and freight class using the Shipping Document spreadsheet. The guide then walks through entering freight specific details in StarShip, selecting a carrier, reviewing LTL quotes, applying the standard 20 percent markup, and entering the final freight charge into SAGE. This process is used for large, heavy, or bulk orders and often requires additional judgment and coordination while learning.
How to create a shipping quote …
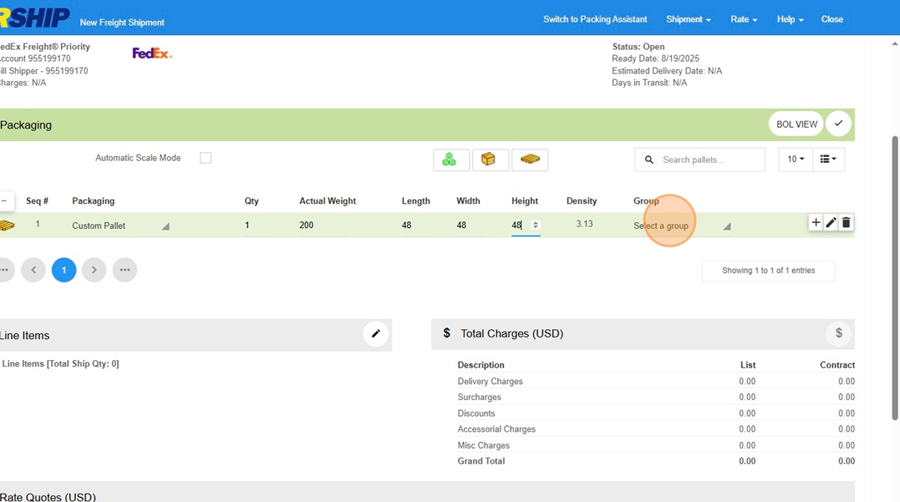
Starship AdHoc Rate Quote
Starship Ad Hoc Rate Quote – Sales Team Training
Purpose
This guide explains how to generate freight rate quotes in Starship without needing to process or ship an order. This allows you to quickly compare rates from multiple carriers and provide accurate freight costs to customers.
Logging In
- Log in to Starship using your assigned User credentials.
-
You will have access to create and view quotes, but you will not be able to process shipments.
Starting a Manual Rate Quote
-
Click "Sage 100 2021 - 2025"
-

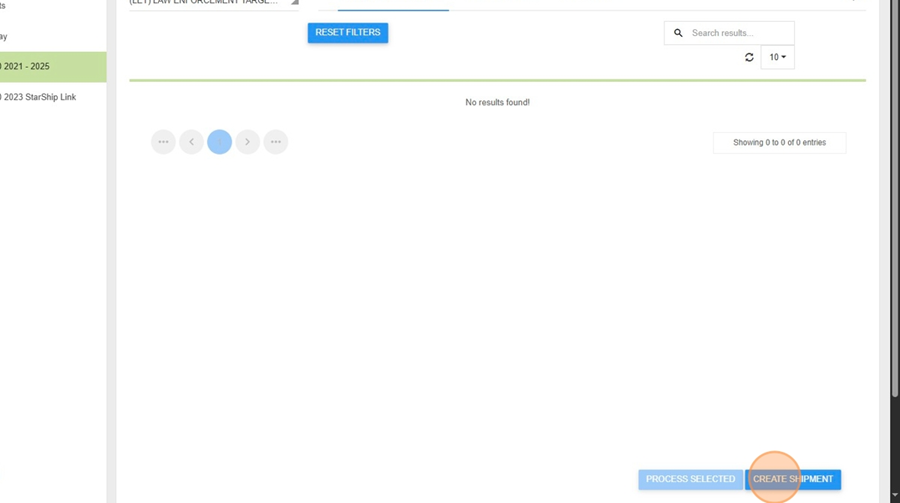
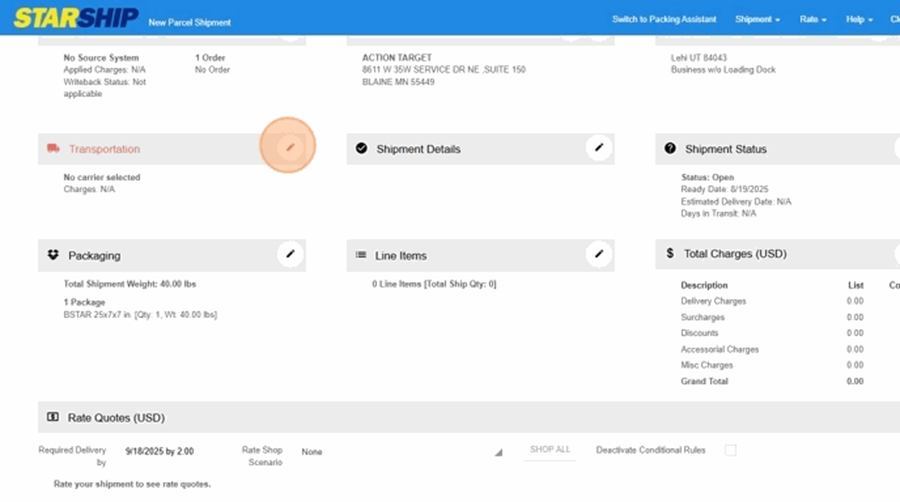
- Navigate to the Shipment Creation Screen
- Click on “Create Shipment” or the equivalent option for manual entry. -

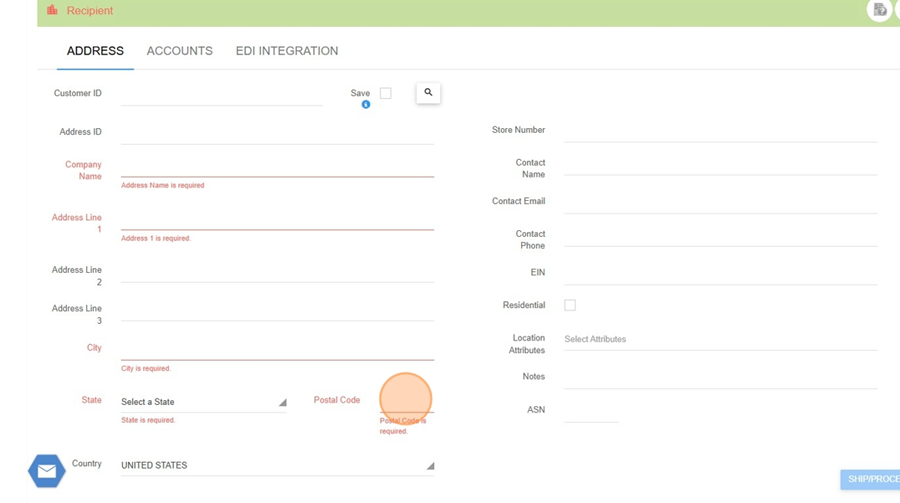
2. Enter Destination Information
- Enter the destination ZIP code. The city and state will auto-populate.
- For other address fields (name, address, etc.), you can enter a period (.) if the actual data is not available. These fields are required but do not affect the quote.


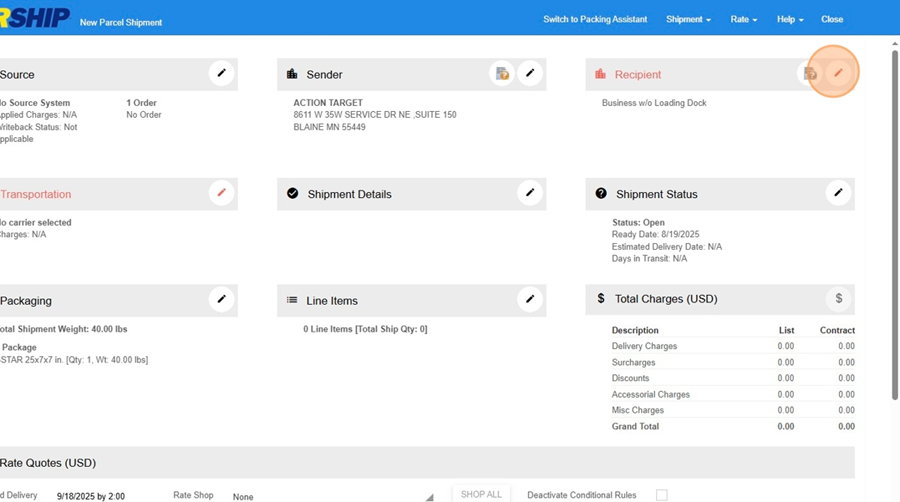
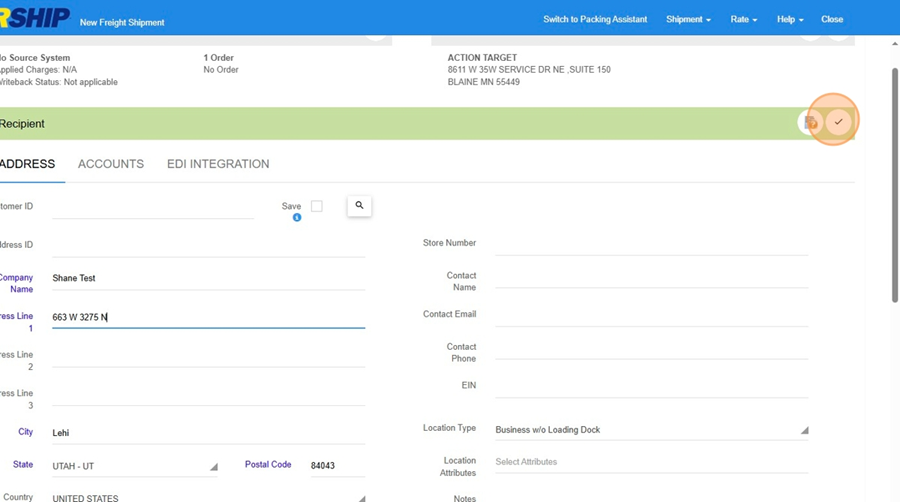
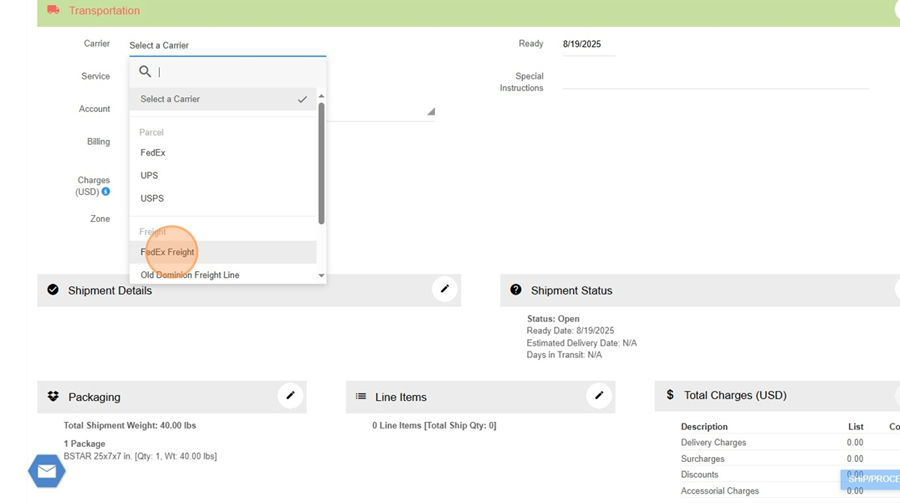
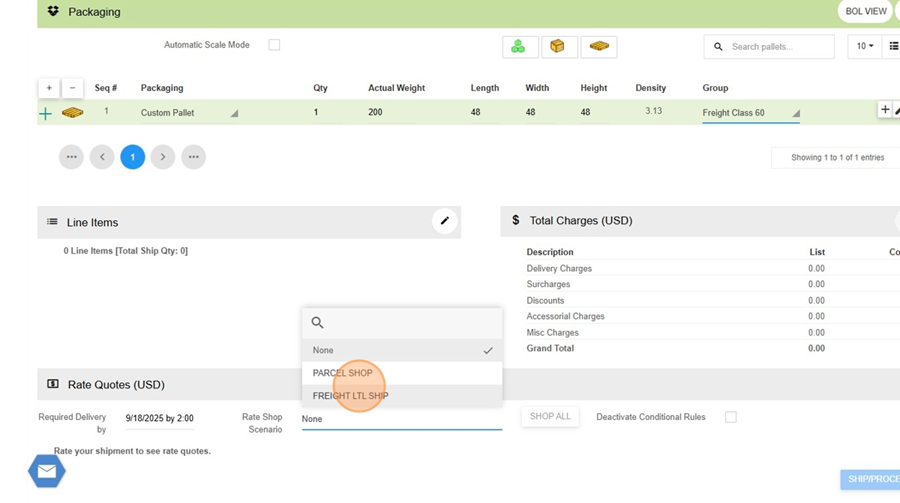
3. Select Carrier Type
- If quoting for LTL (Less Than Truckload), select an LTL carrier (e.g., Old Dominion, FedEx Freight) to enable pallet entry.
- For small parcel quotes, leave the carrier as “No Carrier Selected” or choose a parcel carrier.
-


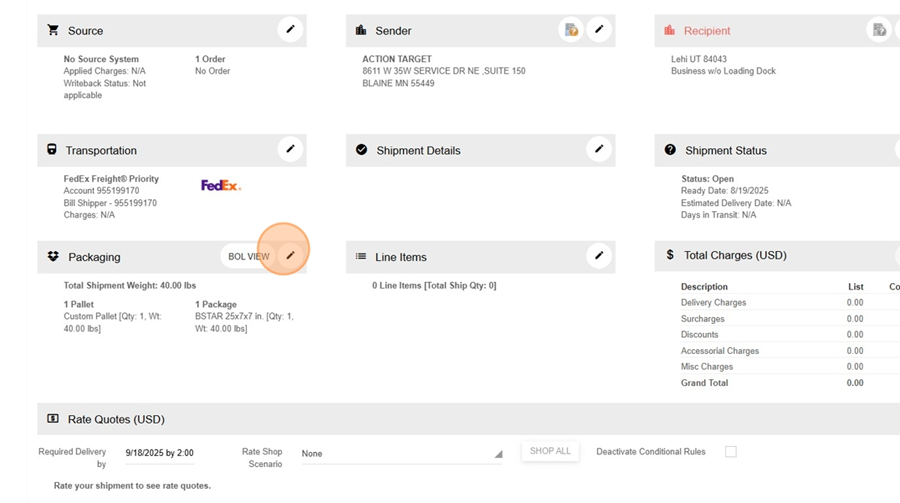
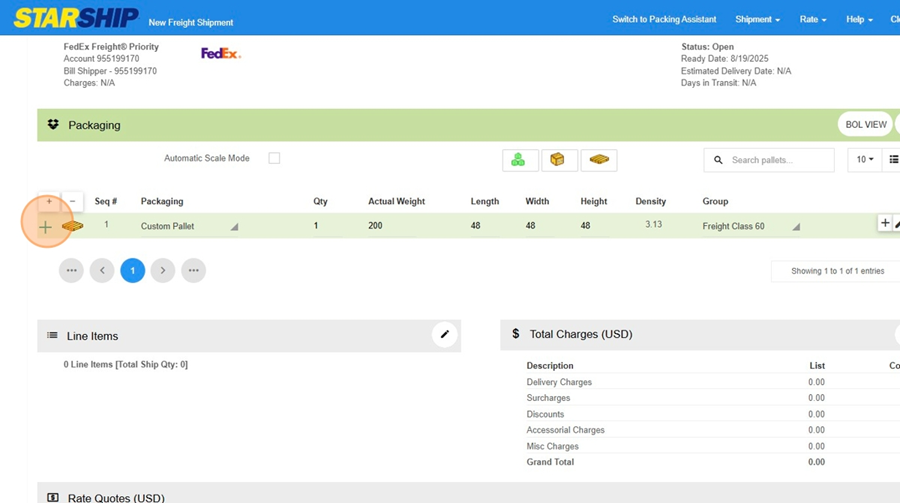
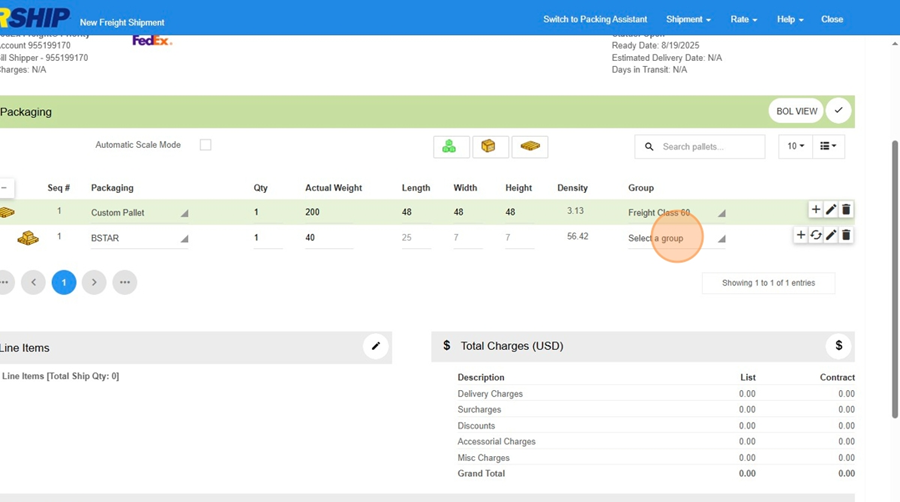
- 4. Enter Package or Pallet Details
- For LTL: Enter the number of pallets, total weight, and dimensions (length, width, height).
- For small parcel: Enter the number of packages, weights, and dimensions as needed.
- Select the appropriate freight class or group (e.g., “Steel Targets,” “Cardboard Targets”).


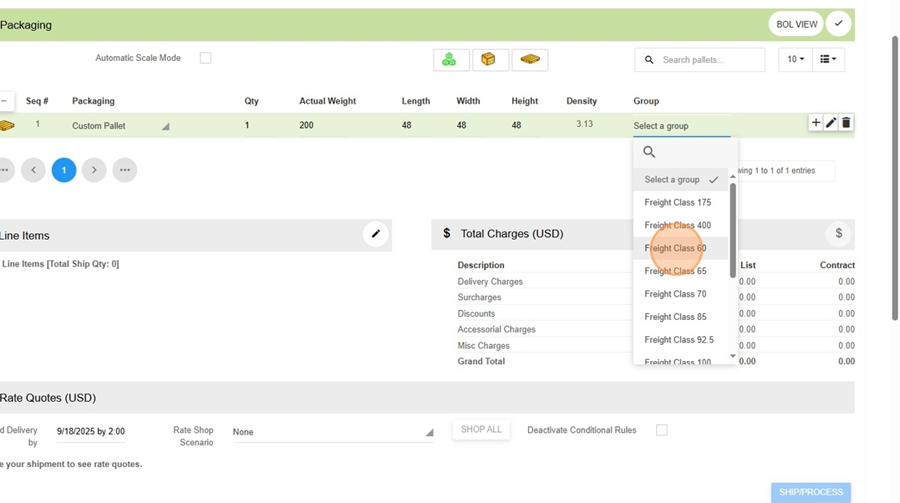
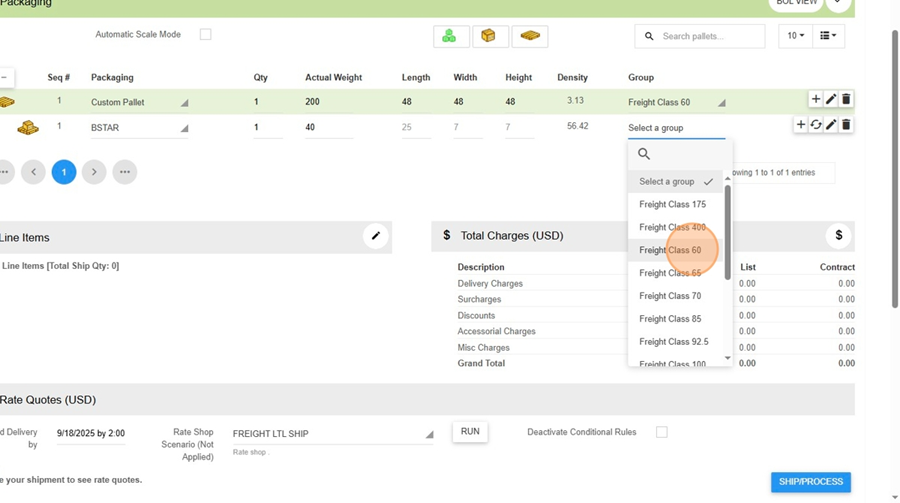
5. **(Optional) Select Carrier**
- You can leave the carrier field blank to get quotes from all available carriers, or select a specific carrier to limit results.
---
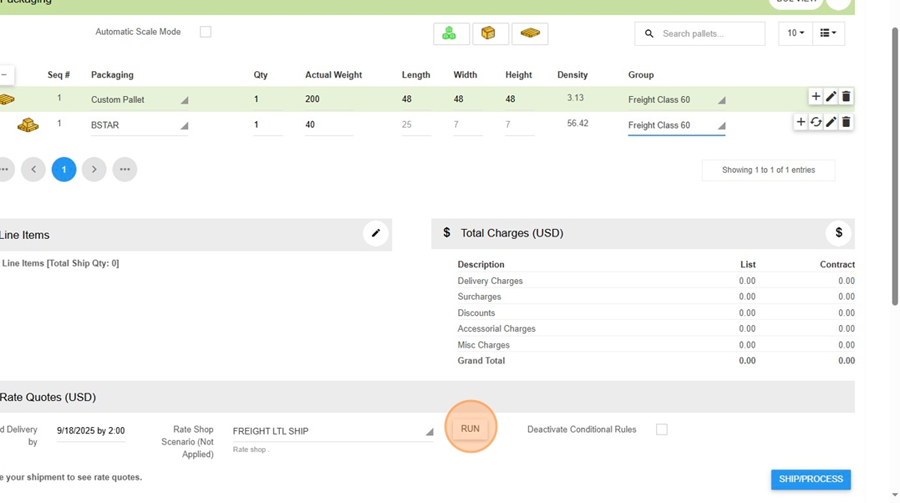
Running the Rate Quote
- Click the “Get Rates” or “Run Quote” button.
- Starship will display rate quotes from all configured carriers for the entered shipment details.
- Review the rates and service levels (e.g., Economy, Priority, Guaranteed). 
---
Recording the Quote
- Note the desired rate and carrier.
- Enter the quoted freight amount (with any markup, if applicable) into your Sage quote or sales order as needed.
- Standard markup rate is 20%
- Do **not** click “Ship” – as a rate quote user, this option will be disabled
Closing the Quote
- Once you have the information you need, close the shipment window.
- Repeat the process for additional quotes as needed.
---
Tips & Best Practices
- You can get multiple quotes from different carriers in one step—no need to visit each carrier’s website.
- If you’re unsure about weights or dimensions, estimate as closely as possible for the most accurate quote.
- If you need to quote for an existing order, you can import the order number (if it’s not a “quote” type in Sage; currently, only standard and backorder types are supported for import).
- For quoting only (not shipping), always use your “Rate Quote User” login.
Determining Lead Time
International Orders and Customs Documents
If you're quoting/placing an order for an international customer, there's a few extra steps you'll have to do. The first one happens as soon as you make the quote, when you're putting that together there's two notes that need to be listed as /C comments:
- Paid in US Funds
- Action Target does not pay for taxes or fees
Additionally, you'll need to ask the customer for their customs broker information. That doesn't need to be listed on the quote, but will need to be in the notes when the order is confirmed.
Once the order is placed, there's two documents you'll need to fill out to help the order ship across the border. The first is the Commercial Invoice, and the second is the Certificate of Origin.
Commercial Invoice
The commercial invoice mostly just involves pulling details from the Sales Order in Sage.
Certificate of Origin
The certificate of origin has a lot of the same information, but includes a few different identifiers.
| Product | HTS Code | NMFC# |
|---|---|---|
| Paper Targets | 4911.91.2020 | 181920 |
| Plastic Targets | 3906.90.2000 | 181920 |
| Polyfoam | 3921.19.0000 | 181920 |
| Cardboard | 4808.10.0000 | |
| Clearing Traps | 7326.90.8688 | 187130 |
| Steel Targets | 7326.90.8688 | |
| Tourniquet (?) | 9018.90.0000 | |
| Plastic Bodies | 9618.00.0000 | |
| Body Wash | 3402.90.3000 | |
| AMMO-UP | 9603.00.0000 | 033010 |
| SIRT | 9103.20.0000 | |
| Cleaning Cloths | 6307.10.0000 | 181920 |
| Portable Runners | 8537.10.9020 | |
| Pocket Pro (?) | 9106.90.0000 | |
| Eyewear | 9004.10.0000 | 168020-00 |
| Rubber Blocks | 4008.11.5000 | 156640-00 |
| Hearing Protection | 6506.10.0900 | 156641 |
| Patches | 5807.10.2010 | 130590-3 |
| CO2 Tanks (?) | 7311.90.0000 | |
| Shot Timers | 9106.10.0000 |
Broker Details
Broker: FedEx Trade Network
Broker Name: Jim Jones
Email: james.jones2@fedex.com
Phone: 310-386-5489
Amazon Orders
See the attached video for how to export amazon orders and get them into Sage. Check for amazon orders every morning, make sure to tell Jennifer if any have come in, and make sure to get/upload tracking numbers by EOD.
Coupons
If a customer would like to apply a coupon to their order, add "/COUPON" as a line item with the coupon code in the comment field.
Once you've done that, make sure the DC box is checked for all the items the coupon applies to. For example, if the coupon is specifically for steel items make sure that only steel items have the DC box checked. Only one coupon code may be applied to an order, so if they want to use multiple they'll have to make multiple orders.
After that, on page 4 of Sales Order Entry, you can either set the Discount Rate to the percentage off that they get on the checked items or you can input a dollar amount on the Discount Amount line. This will automatically apply that discount to the totals of those items.
Certain customers who work in the same space as us will get the Industry Discount. Industry pricing is the cost of the items plus 25%. If a customer is asking for industry discounts, ask Jesse to see if they qualify for it.
Marketing/Internal Orders
If you're putting together a quote for marketing, core sales, or any other ATI employees, the final price for each item is cost plus 10%.
To get the cost, pull up the item in Item Inquiry and pick the highest between Standard Cost, Average Cost, and Last Cost Total. Multiply that number by 1.1 and you'll have the price for the internal order. Calculate shipping as normal.
Product Information
Item Inquiry
Sales Kit Report
Sales Kit Report is a module in Sage that can show you all the different items in a Kit type item. All you have to do is put the Kit SKU in the "Value" column.
From here, you can either click "Print" to download a pdf of the list, or click "Preview" to see the list without downloading it.
Filters
See Camfil Lunch and learn Video. For information about how to position and sell filters.
See How to Select Filter Video. For information about selecting and identifying filters.
D-Lead Training
Tactical Grit
Qualitex Report (Independent 3rd Party Tester)
Out of Stock Items
If an item is out of stock/backordered and you need to know when it's expected to restock, pull the item up in Item Inquiry. At the bottom of the page, you'll see a list of numbers. The "On Hand" amount is how many we physically have, including any that are already sold and just waiting to ship. The "Committed" amount is how many are currently on orders. The "Available" amount is how many spare we have that aren't assigned to orders yet.
(picture of the quantity lines)
In some cases, you can ask the warehouse to prioritize an order to pull from the "On Hand" amount instead of "Available". For example, if a customer orders 25 of a target but an order for 10,000 is holding it up, you may push the smaller order to the front. This could also be used if an order that's waiting for multiple targets to restock is preventing another order from shipping out.
Most of the time, you'll be waiting on the item to restock. You can check when more are expected on tab 6 of Item Inquiry. This will show you all the orders we've placed for the item, and when they were expected to arrive. At the bottom of the list, you'll see the newest orders which will often have a Req Date. That date is when we're expecting to restock the item.
(picture of the Orders screen)
In some cases, there won't be an open order for the items. In those cases, let customers know what to expect. New orders for paper take around 4-6 weeks, new orders for cardboard take 5-8, and steel takes 12+ weeks. If the order has a Req Date that is in the past, the items are overdue. Ask Eddie Crow (ecrow@actiontarget.com) for more details, as no more are tracked in Sage.
Customer Communication
Sales Email Process
Phone Queue
After Sales Items
Shipment Tracking
Once an order has shipped out, you can find the tracking information for that order directly in Sage. An easy way to check if an order has shipped out is to put the order number into Sales Order and Quote History and see if the "Invoices" button in the upper right corner is clickable. If it is, at least a portion of the order has shipped.
Clicking the Invoices button will pull up a list of all the invoices for the order. There could be multiple if the order shipped from multiple warehouses or shipped in multiple parts.
Clicking on an invoice will open Invoice History Inquiry. From here, you can see the Ship Via that was used for the order. If it's FedEx or UPS, you can see a breakdown of the boxes and their tracking numbers by clicking the "Tracking" button.
You can also click the button that looks like a box on the right side to pull up the tracking for that package on the carrier's website.
If the order was sent LTL, the tracking number is usually listed in the Comment line
Expediting Customer Orders
Any order that needs to ship FedEx Air (Next Day, 2nd Air, 3-Day Air) must be received at the Blaine warehouse by 11:30am Central Time/ 10:30am MST (Utah) time. (They need time to pick & pack to have the label ran off before noon (Central Time) to trigger a pick-up for that day.
“Must ship Orders” should be received at the same time due to not knowing the size of the order to be picked & packed. Otherwise, they will go out the next day if noted on order.
Must Ship Truckline/ LTL Orders will ship out within 2 business days if needed. Usually the next business day., depending on the size and time it takes to get picked & packed. “Must Ship” must be noted on the order.
Returns
If a customer wants to return items, there's a few things you'll have to consider. The most important things are why they're returning the items and how many they're returning.
If a customer wants to return an order because of a defect or an issue we caused, we're more likely to provide shipping labels. When you get these requests, forward them to Jennifer Deelstra (jdeelstra@actiontarget.com) and she'll tell you how to proceed. Usually this will either involve sending the customer a shipping label or telling them that a return isn't necessary. Sometimes, this may involve placing a new order at no cost as a correction for the incorrect order.
If a customer just changed their mind or wants to return for any other reason, we can accept returns of unused products but with a few caveats. First, we won't provide a shipping label so they'll have to pay to ship the items back to us. Second, we only refund the item price and not the shipping on their original order.
All of this is up to Jennifer's discretion, so always email her to see how she'd like you to proceed before making any promises to the customer.
Invoice History
Invoice History Inquiry has a few important uses for us, mostly letting us see details of orders that have already shipped out. You can check tracking on orders, see when an order shipped out, check to see if the customer was charged tax, see if the invoice has been paid or not, and see what items were on any given shipment.
Invoice numbers are different from quote/order numbers, and are only generated once the order ships out. They should always start with a zero, if they start with a one they're for AMS and the customer should be passed to their territory's account manager.
Along the top, you'll see the order number that the invoice is linked to and the date that the invoice was generated. The invoice date and the shipping date should be the same.
Below that you'll see the customer's account details, the PO used to place the order (if there was one), their contact information, and the totals from the order. Here, you can see how much they were charged for tax, shipping, and the items. If a customer was charged tax that wasn't meant to be, see Tax Refunds.
You can also get tracking information for orders from this tab, see Order Tracking for more details.
On tab 2, you can see a breakdown of the line items on the invoice. We only invoice what we ship, so you can use this to see which items were shipped from an order on any given invoice.
Tab 3 shows you any payments applied to the invoice, so you can see if the invoice was paid with a card, check, or wire payment.
Damaged, Missing, and Incorrect Orders
Custom Targets
Custom Target Inquiry
When a customer reaches out about a custom target and are asking about the below information anyone can provide it. If they are still interested pass them over to Dan or Myself. Verify the customer is interested in getting the minimum quantity and is okay with the timeline will save all of us time.
Minimum Orderable Quantity
Paper – 2,500, if the size is larger than 23”x25” the minimum might go up to 5,000
CB – 5,000
Steel – We do not offer custom steel targets.
Designing the target
We will design the target based on what they want. They can’t customize any target but most of our targets they can add there logo to or make slight changes to as long as they hit the minimum. An example of a design we would use is the FLDC-P as we designed it with another organization.
Customer description is send to marketing they make a mockup > we send to customer > provide feedback to marketing > they update > Repeat until customer is happy with design.
Pricing
Pricing depends on the number of colors used, paper size, weight, etc. We can quote them once we have the requirements of their target.
Leadtime/Timeline
Generally it takes between 4 and 8 weeks. Depending on how many iterations we do to the original mockup.
Exclusive to the agency or do we sell online?
The target is generally exclusive to the agency unless they want us to sell it online and it’s a product we believe will sell well. As a rule of thumb we don’t commit to stocking their target but that’s something Dan and myself can work out.
Website
Create an Account
Adding an Account to an Existing Account
Go to shop.actiontarget.com > Sign In > Create a new contact for your account (2nd option from the bottom of the sign in pop up) > Enter your account number, zip code, and the security code > Complete. Doing this will link your online account to your existing account with your specific pricing and tax exemption if applicable.


Password Reset
FAQ
Sage Pricing
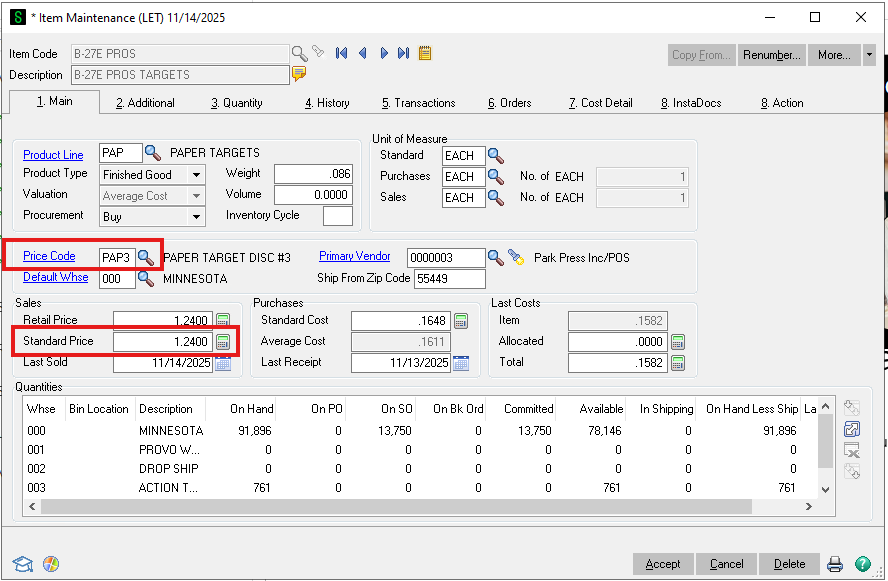
This is to describe how Sage deals with Pricing.
Starting with the item. Each item has a Price Code and a Standard Price. The below screenshot is from "Item Maintenance"
Then we have the "Price Code Maintenance" item, which is also in the Inventory Management Module in Sage.
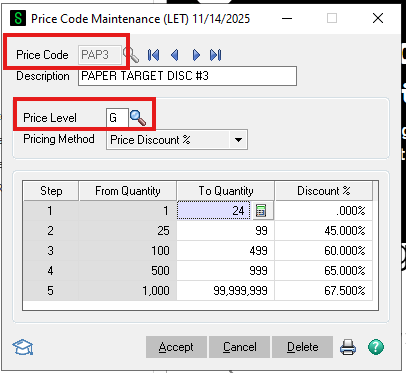
Quantity Discounts
For Quantity discounts the Price Level that we use is G. You can then see that there are 5 levels of qty discounts and then the % discount from Standard Price of the Item. Below is the illustration for the Price Code of PAP3
Dealer Discounts
There are currently 3 Price Levels for dealers. They are simply 1, 2, and 3 or blank.
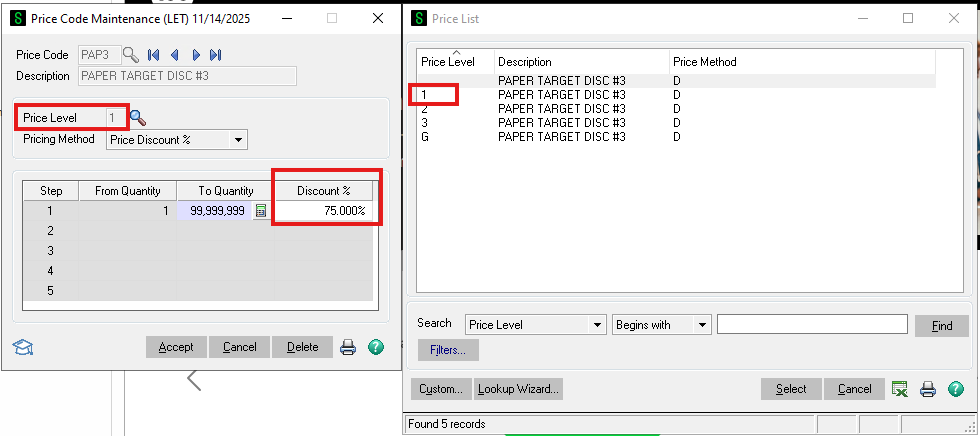
Customers can be assigned a Price Level in "Customer Maintenance". Again, it can be 1-3 or also blank. If blank then they don't get any discount.
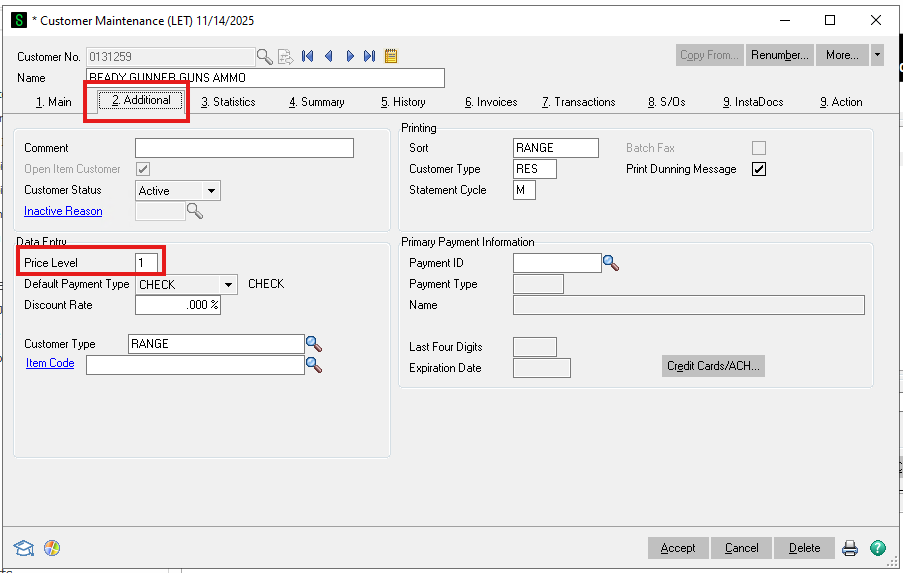
In this example the Customer "Ready Gunner" has Price Level 1 and will get 75% off the Standard Price of any products with Price Code of PAP3, which in this example is the "B-27E PROS" paper target.
If a customer is not assigned a Price Level, then they will pay the Standard Price for the product if they buy less than 25. Otherwise they will get the Quantity Discount Pricing for all PAP3 products.
Below are the database tables and the connections between them.
