Shipping Systems
Processes involving the systems used in shipping.
- Starship
- Starship Cloud - User Connector Config
- Starship - User Setup Printers
- Starship Cloud - User Print Profile
- Shipping
- Basic Shipping Quote Training
Starship
These are the pages to follow to setup a user in Starship
- Create connector
- Setup Printers
- Setup Print profile
Starship Cloud - User Connector Config
1. Double-click on "Starship Online Connector"

2. Click on the "Printing" tab

3. Click on "Configure"

4. Choose the location (s) where the User will be shipping from. You can choose multiple locations.

5. Click "OK"

6. Click on "Save and Restart". Then wait until the Staus shows Connected and the location(s) are in there with Active next to them.

7. Once it looks like below with the location(s) and the Active showing, you are done here. DO NOT CLOSE the Connector. This MUST STAY OPEN while you are using Starship Cloud. It can be minimized.

8. MINIMIZE the window

9. Open a browser

10. Type in "let.starship.online" and go to the page
Log in with your Starship Cloud Username and Password. This should have been emailed to you.

11. Click on the Gear icon

12. Click "New Company"

13. Choose the connector you just created.

14. Click "Next"

15. For Company Name - Your Username (the example below is swithers)
For Sage Company Code - LET
Click on "Next"

16. Click "Finish"

Starship - User Setup Printers
Follow these steps to setup the Printers for the user. Typically 2 printers are needed:
- Laser Printer
- Lable Printer
The Starship Online Connector on your desktop must be setup and running on your desktop before you can do any of these steps.

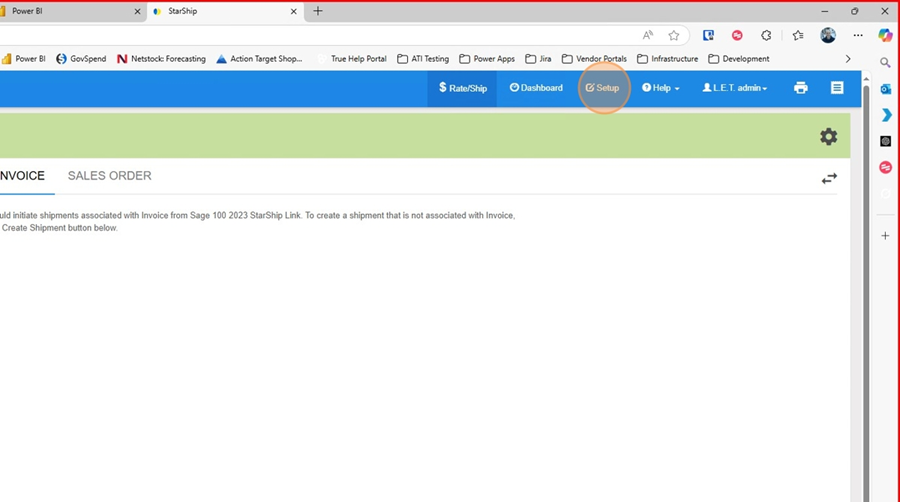
1. Click on "Rate/Ship"

2. Choose the user connector

3. Click on Setup

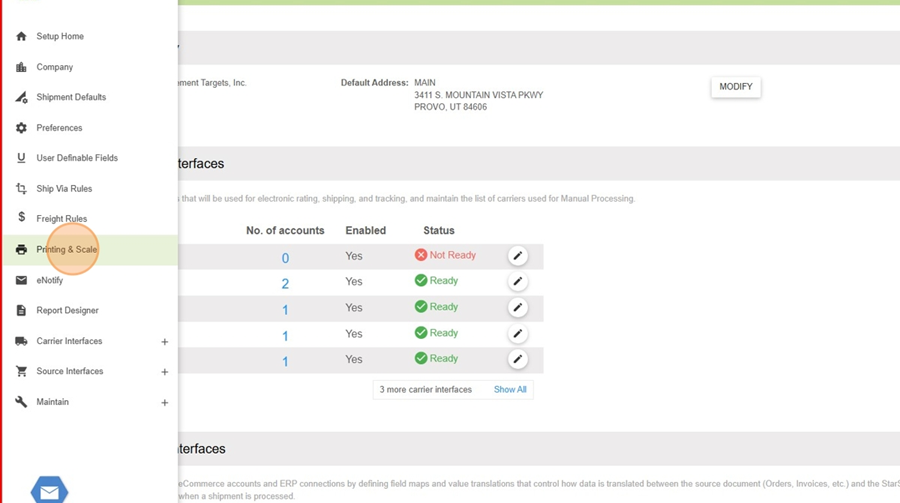
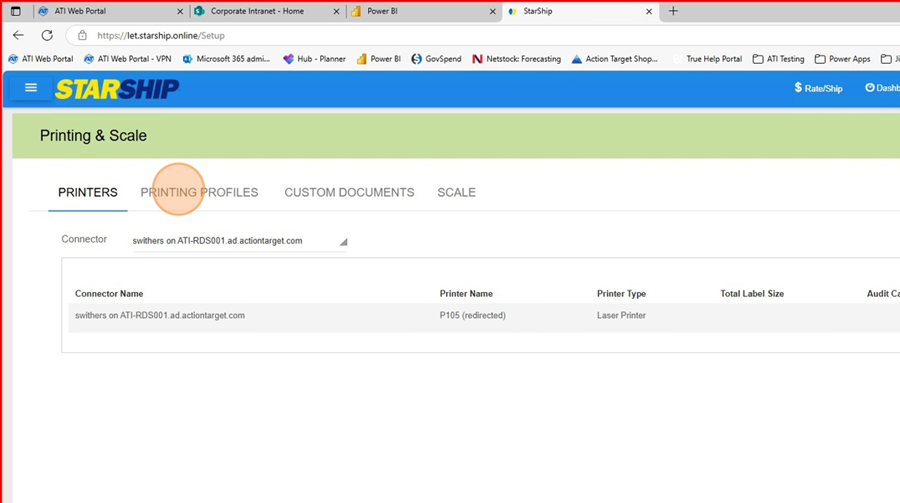
4. Click on "Printing and Scale"

5. Under Printers choose the Connector you want to add printers to


7. Click on "Add Printer"

8. Select the Printer to add


10. Click Submit

11. Continue until all of the Printers the user will be using are added.
Starship Cloud - User Print Profile
The Starship Online Connector on your desktop must be setup and running on your desktop before you can do any of these steps.
Printing Profiles are used to print the correct labels and paperwork for each of the different Shipping companies that we use. In Blaine, there are 2 main profiles, one for Truck lines and one for Parcel shipments, although each station can ship both.
For purposes today, we are going to Copy the profile
- In Starship Cloud click on Setup
2. Click on "Printing and Scale"
3. Click on "Printing Profiles"
4. Click on the Printing Profile you want to copy and then click on "Copy"
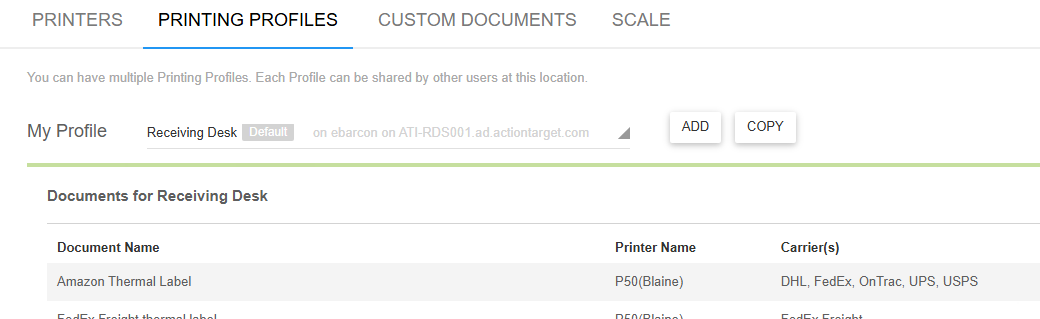
5. Choose the connector that you want to create the profile for
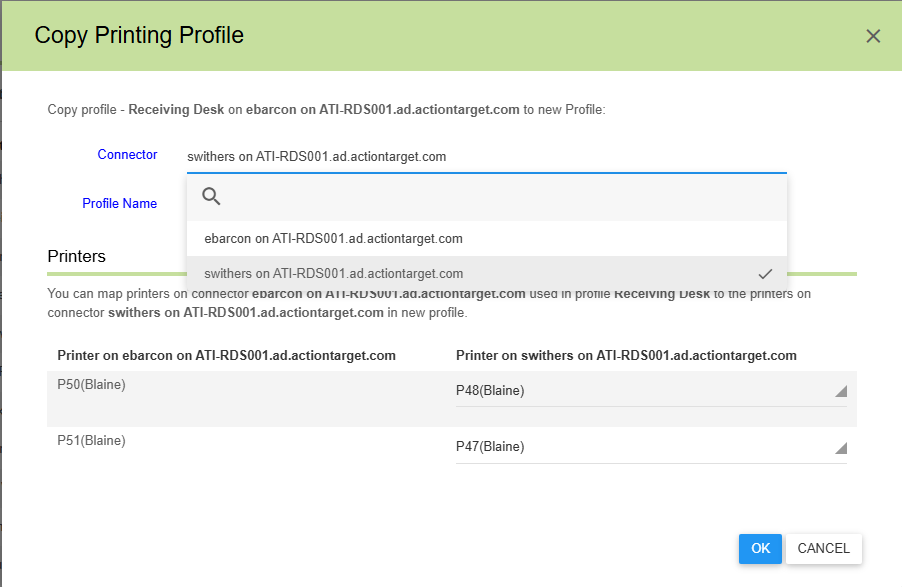
6. Name the Profile and choose the printer you want to copy of the user.
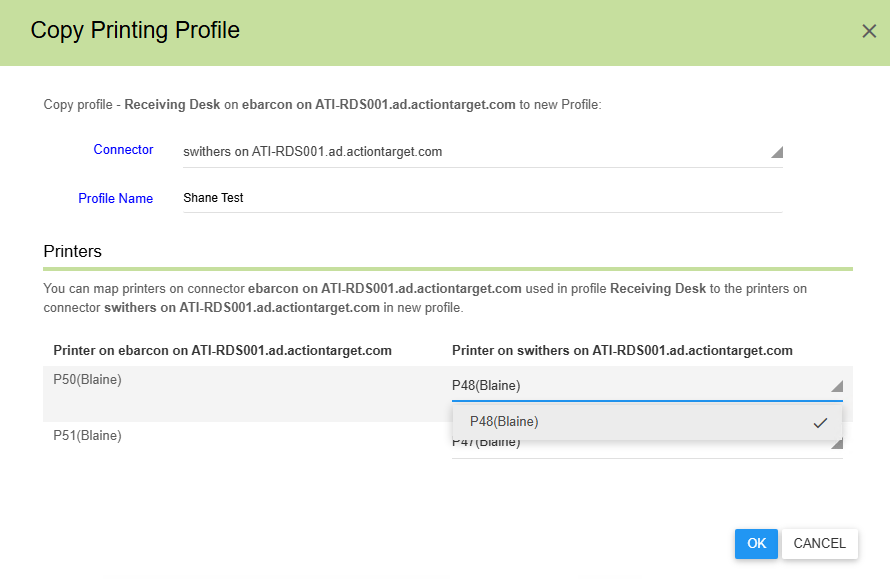
7. Click OK and then you are done.

Shipping
Create a Starship Shipment with FedEx Freight Page
Create a Starship Shipment with FedEx Freight

-
Click the "User ID" field.

-
Click here.

-
Click "Sage 100 2021 - 2025"

-
Click "Create Shipment"

-
Update the Recipient

-
Fill out the Recipient Address

-
Click here.

-
Click on Transportation
Click "Select a Carrier"

-
Click "FedEx Freight"

-
Click this button.

-
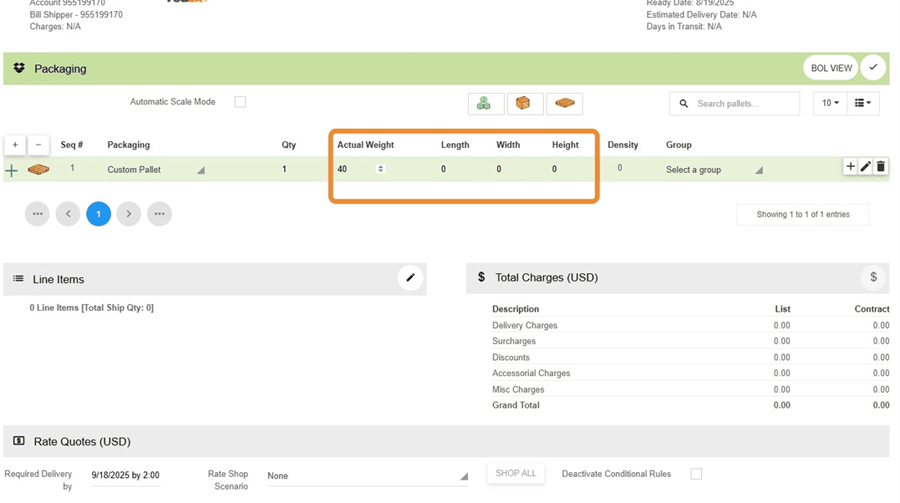
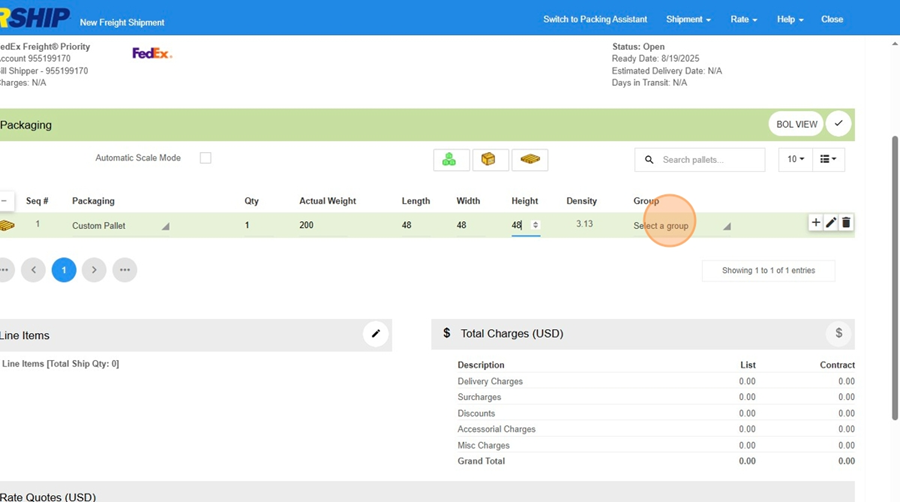
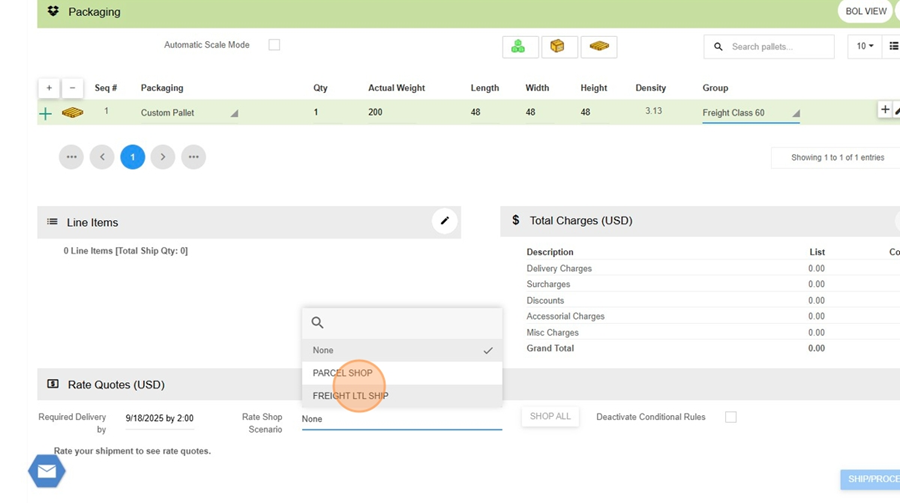
Fill in the Weight, Length, Width and Height
-
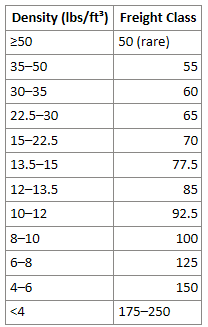
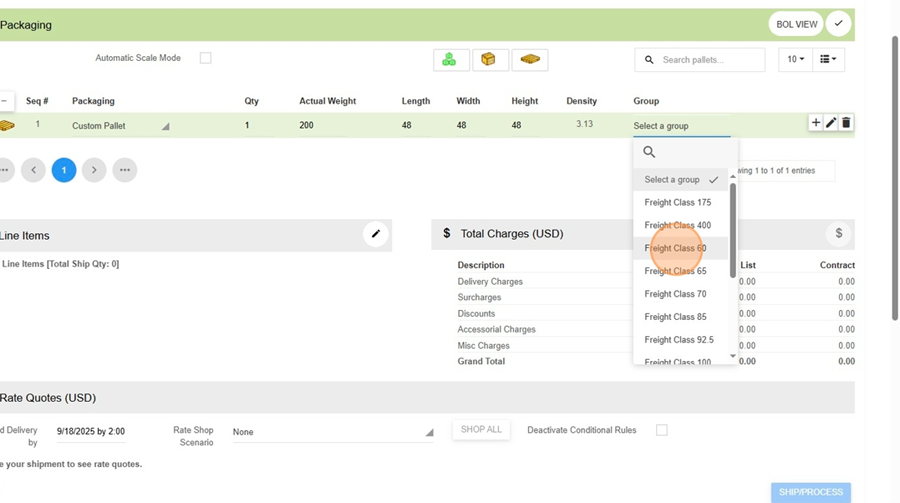
Click "Select a group" based on the Density field next to the Group. Use this table to choose the correct group.
-
-
Choose the correct freight class
-
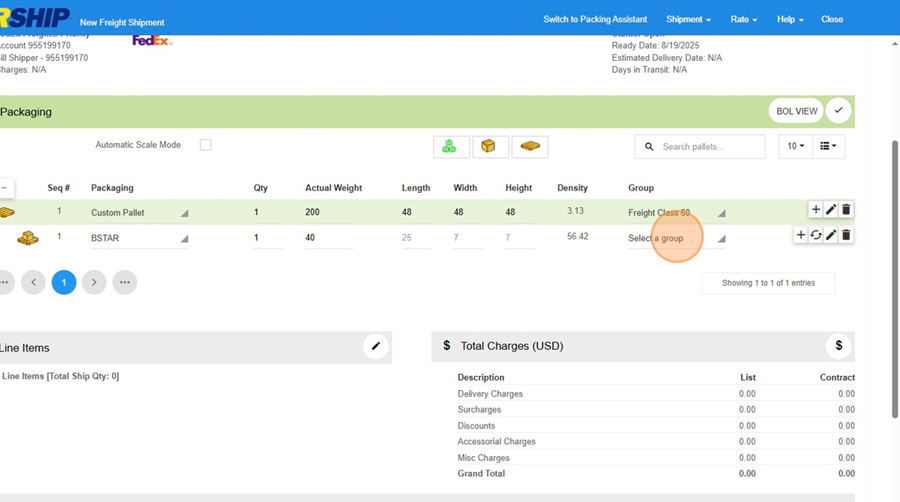
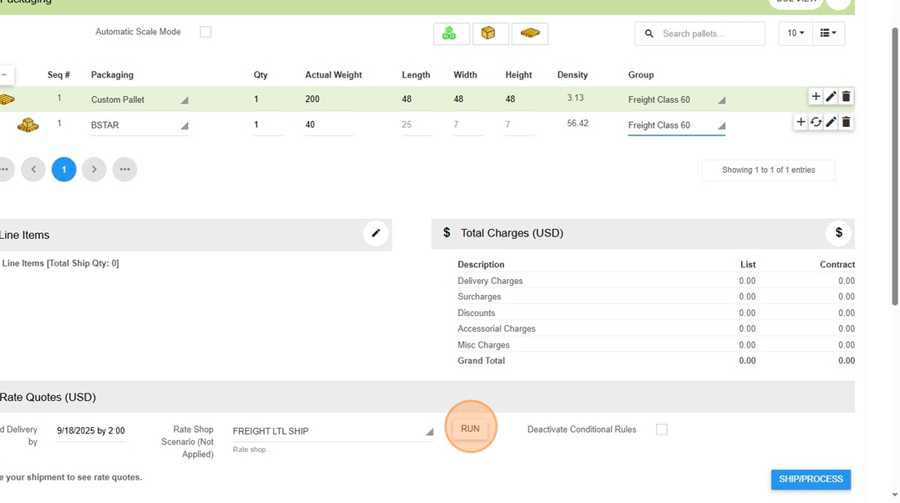
Open up the pallet

-
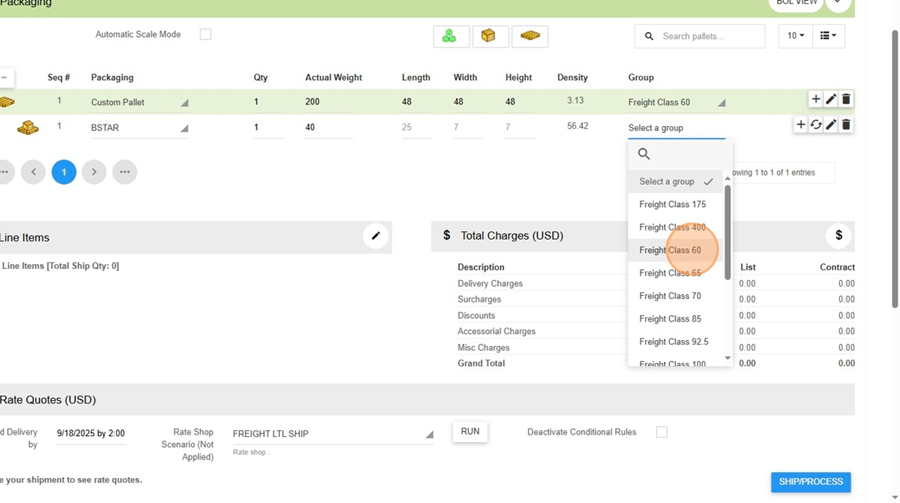
Choose the appropriate group for the package
-
Click "Freight Class 60"
-
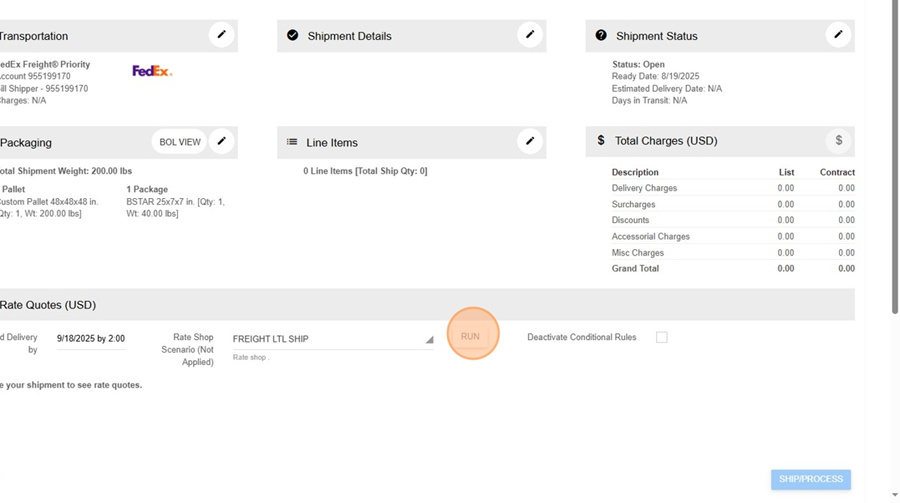
Click "FREIGHT LTL SHIP"
-
Click "Run"
-
Click "Run"
-
Click "OK"

Shipping to APO, FPO, and DPO Addresses
Standard Operating Procedure (SOP)
Shipping to APO / FPO / DPO Addresses
1. Scope and Definitions
APO / FPO / DPO
Military mail destinations. These are handled through USPS regardless of physical overseas location.
- APO – Army / Air Force Post Office
- FPO – Fleet Post Office (Navy / Marines)
- DPO – Diplomatic Post Office
Key Rule:
All APO/FPO/DPO shipments are treated as USPS shipments, not FedEx, UPS, or DHL.
2. Shipment Type Decision
Before quoting or processing, determine shipment type:
A. Small Parcel Shipment (Standard Process)
Use USPS directly when:
- Shipment consists of individual boxes
- Total shipment is manageable (typically < ~10–15 boxes)
- No palletization required
B. Large Shipment (Consolidation Required)
Use consolidation when:
- Shipment is palletized or large volume
- Example:
- 1,000 backers + 5,000 targets
- 20+ boxes
- USPS direct shipment becomes inefficient or cost-prohibitive
3. Small Parcel Workflow (USPS Direct)
Step 1: Prepare Box Data
For each box:
- Measure dimensions (L × W × H)
- Determine weight
- Identify contents (if needed for internal reference)
Important Rules:
- Each box must be processed individually
- USPS does not support multi-box quoting in a single entry
- Even identical boxes must be entered separately (or calculated once and multiplied)
Step 2: Use USPS Rate Calculator
Input:
- Ship From ZIP Code:
55449(Action Target) (confirm if needed) - Ship To:
- City: APO / FPO / DPO
- State: AE / AP / AA (auto-populates)
- ZIP: Provided by customer (e.g., 09439)
Step 3: Enter Package Details
For each box:
- Weight
- Dimensions
- Quantity = 1
Repeat for each box OR:
- If identical boxes:
- Calculate one box
- Multiply cost by total quantity
Step 4: Select Service Type
General guidance:
- USPS Priority Mail → Preferred for APO/FPO/DPO
- USPS Retail Ground / Standard → Rarely used for military mail
Note:
- APO/FPO/DPO is technically treated as domestic mail but behaves like international
- Priority typically offers better reliability
Step 5: Calculate Total Shipping Cost
- Sum all individual box costs
Step 6: Apply Markup
Apply standard margin:
- Typical: 10%–20%
Step 7: Provide Quote
Deliver:
- Total shipping cost (with markup)
- Service type (Priority recommended)
4. Large Shipment Workflow (Consolidation Required)
Step 1: Identify Consolidation Need
Trigger conditions:
- Pallet shipment
- Excessive number of boxes
- High USPS cost or labor burden
Step 2: Contact Customer
Request the following:
“Please provide a stateside consolidation point address and all required routing information for forwarding to your unit.”
Step 3: Required Customer Information
Customer must provide:
- Consolidation point address (U.S.-based)
- Unit information (final destination)
- Required identifiers (if applicable):
- TCN number
- DSN number
- Unit number
- Contact name (e.g., John Doe)
- Any special labeling instructions
Step 4: Create Sales Order
Ship-To Address
- Enter consolidation point address
Order Notes
Include ALL provided routing data:
- Final APO/FPO/DPO destination
- Unit identifiers
- Contact details
- Any special instructions
Principle:
More information is always better for downstream handling.
Step 5: Create Shipment Placard (Required)
Create a document (Word or equivalent) containing:
- Final destination (APO/FPO/DPO)
- Unit information
- TCM / DSN / routing numbers
- Contact name
Step 6: Labeling and Placement
For palletized shipments:
- Print placard
- Attach:
- Front of pallet
- Back of pallet
Step 7: Shipment Execution
- Ship to consolidation point via standard domestic carrier - may be any LTL carrier.
- After delivery:
- Consolidator assumes responsibility
- They route shipment to final APO/FPO/DPO destination
5. How Consolidation Routing Works
The consolidator determines final routing based on:
- Information on placard
- Sales order / packing slip data
- Internal military logistics systems
Key Insight:
You do NOT control final leg routing.
Your responsibility is to provide complete and accurate data.
6. Edge Cases and Exceptions
A. Customer Insists on Direct USPS (Large Order)
- Possible but inefficient
- Requires:
- Manual calculation of every box
- Potentially very high cost (e.g., $8,000+)
- Proceed only with customer approval
B. Customer Does Not Know Consolidation Process
Guide them:
“Please check with your logistics or supply chain contact for a consolidation shipping address and required routing information.”
C. Mixed Box Types
If boxes differ:
- Each must be calculated separately
- No batching allowed
7. Key Rules Summary
- USPS is mandatory for APO/FPO/DPO
- No FedEx, UPS, or DHL
- Each box must be quoted individually
- Large shipments require consolidation
- Always collect routing data from customer
- Always include redundant labeling
8. Quick Decision Flow
- Is shipment small (few boxes)?
- YES → USPS direct
- NO → Go to consolidation
- Is shipment palletized or large volume?
- YES → Request consolidation point
- NO → USPS direct
9. Operational Best Practices
- Always over-communicate shipping constraints
- Avoid underestimating labor for large USPS shipments
- Default to consolidation for anything non-trivial
- Include redundant routing info on:
- Sales order
- Packing slip
- Physical labels
Basic Shipping Quote Training
Follow steps in SAGE and StarShip to create a basic quote for shipping to add to a customer quote.